Ec2 instances, part of AWS, are essential for understanding the cloud. it offers virtual machine, storage (EBS), load balancing (ELB), and scalability through autoscaling group (ASG). A cornerstone service, Ec2 enables flexible and scalable application deployment on the AWS platform.
Table of Contents
Step 1: Log in to the AWS Management Console
First things first, log in to your AWS Management Console. If you’re already logged in, you should see the main dashboard.
Step 2: Navigate to the EC2 Dashboard
Once you’re in the console:
- Go to the EC2 service by searching for it in the “Services” search bar.
- Click on EC2, and you’ll be taken to the EC2 dashboard where you can view all your EC2 resources, like instances, IP addresses, and load balancers.

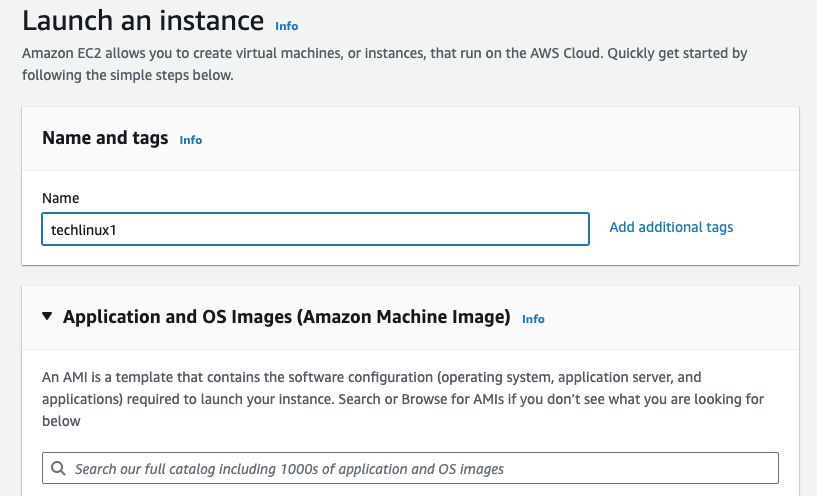
Step 3: Launch a New EC2 Instance
Now, let’s create a new EC2 instance:
- First, select a region after Go to the “Instances” section on the EC2 dashboard.

- Click on “Launch Instances” to start the setup.


Step 4: Select the Ubuntu AMI
Here’s where you choose the Amazon Machine Image (AMI): An Amazon Machine Image (AMI) is a pre-configured virtual machine that serves as a template for your EC2 instance. You’ll be prompted to choose an AMI from a list of available options. You can choose from Amazon Linux, Ubuntu, Windows, and many other options.
- Under the “Application and OS Images (Amazon Machine Image),” search for and select the Ubuntu Server 22.04 LTS AMI.
- Ensure it’s the latest version and marked as free tier eligible.

Step 5: Choose an Instance Type
An EC2 instance in the AWS cloud is a virtual server. The first configuration to choose is the Amazon Machine Image (AMI), which is a base server image stored in the cloud containing the OS, preinstalled software, and data included in the EC2 instance when it launches.
Next up, instance type:
- Select the t2.micro instance type, which is free tier eligible.
- This instance type is perfect for small workloads and testing.

Step 6: Create a Key Pair
Security Groups are acting as a firewall on EC2 instances. They regulate:
A key pair is essential for logging into your instance securely:
- You can either use an existing key pair or create a new one.
- For this tutorial, let’s create a new key pair. Name it something like “new-login-key” and choose the techlinux.pem format.
- Download the .pem file and store it securely. You’ll need this to SSH into your instance.


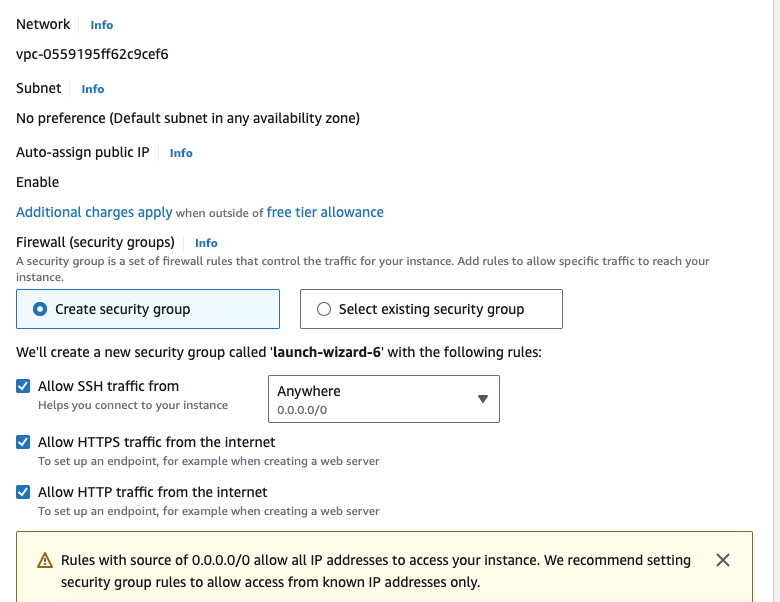
Step 7: Configure Network Settings
Let’s keep things simple here:
- Use the default VPC (Virtual Private Cloud).
- Enable auto-assign Public IP to ensure your instance is accessible.
- Leave the subnet as “No preference” and let AWS handle the rest.

Step 8: Set Up a Security Group
Security Groups are acting as a firewall on EC2 instances. They regulate and control inbound and outbound traffic for your Amazon EC2 instances. It plays a crucial role in ensuring the security of your cloud environment by defining the rules that determine what kind of network traffic is allowed to enter or leave your EC2 instance.
Security groups control access to your instance:
- Create a new security group and let AWS name it (e.g., launch-wizard-1).
- Ensure that SSH (port 22) is open to allow you to connect to the instance.
- You can set the source to “Anywhere” for now, but be aware of the security implications.
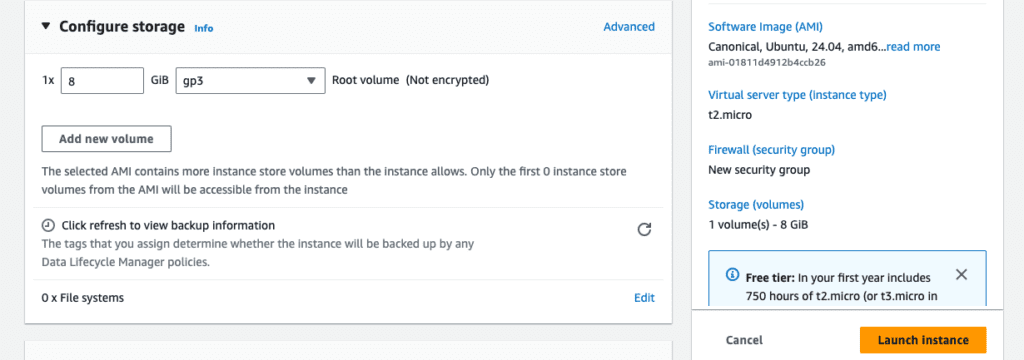
Step 9: Review and Launch the Instance and Configure storage

Almost there!
- Review all your settings: instance type, AMI, key pair, security group, and storage.
- Click “Launch Instance” to spin up your new EC2 instance.
- You can monitor the instance’s status on the Instances page.
Step 10: Connect to Your Instance Using SSH in mac os

Now, let’s connect to the instance:
- download the keypair(.pem file) and go to that location (keypair(.pem file) (Note that you can use absolute path name for key pair instead).
- Give to read permissions in .pem file chmod 400 [your_key_name].pem (Note that to make SSH work, your key must not be publicly viewable.
- ssh -i “[your_key_name].pem” ec2-user@[your ec2 dns name].


Step 11: Connect to Your Instance Using SSH in Windows
- Use an SSH client like PuTTY. If you don’t have it, download and install PuTTY and PuTTYgen.
- First, convert your .pem key to a .ppk key using PuTTYgen. Load the .pem file and save the private key as a .ppk file.
- In PuTTY, enter the instance’s public IP address in the Host Name field.
- Go to Connection > SSH > Auth and browse to select your .ppk key.
- Click “Open” to connect to your instance. When prompted, enter the username ubuntu.
Step 11: You’re Connected! What’s Next?
Congratulations! You’re now connected to your Ubuntu EC2 instance:
- From here, you can start installing dependencies, running applications, or setting up a web server.
- The possibilities are endless – it’s your server, so make it work for you!


